Mechanical Tipps
Contents
- Pumping Air into the Fork
- Problem mounting the stanchion tube during assembling because of seal flip
- Pull the stanchion tube out of the slider tube
- Disasemble Air Cap
- Handle corrosion on stanchions
- XC500 : Screw off grub screw part no. 314
- Loose Inbus Screws
- XC400 and older: Unscrew the upper tube fitting
- … (tobedo)
Pumping Air into the Fork
Affected Models: DH3, XCR, XC500, XC600, XC700, XC50, XC51, TT10, PF1, etc. – all forks without an air/oil separator
NOT affected Models : StarFork, XC400, XC300, XC300, XC150, XC100, MX100, etc.
Problem: Most of the older forks do not have an air/oil separator piston. As this are Oil-/Air Forks, the inside has an air/oil mix. So if you fill in air e.G. after riding or horizontal transport, oil will come out of the valve and makes the valve and the outside of the valve oily.
Solution: Always do pumping only after a pause, where the air/oil mix can be resting and separate.
Problem mounting the stanchion tube during assembling because of seal flip
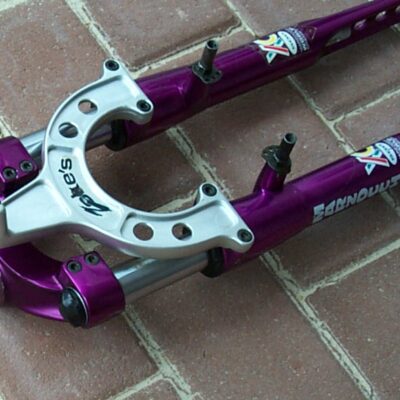
Affected Models: XC500, XC600, XC700
Problem: You are assembling your fork after you have cleaned all parts, put all the seals ready, have mounted the o-ring (312) and the inner lip seals (313) on the assembly (301 – adjuster knob ton the the foot valve set). You are fixing the slider tube, put some oil in, put the 301 assembly in and now we are comming to the problem: we want to push the stanchion tube in and it will not slide in easy, no, it is somehow blocked. You can move it, but something is blocking movements.
Solution: Adjust the conic lip seal on 301! It has to be fliped 180° (the open part shows to the bottom), you have mounted it in the wrong direction.
Tauchrohr aus Standrohr ausziehen
Betroffene Modelle: XC500, XC600, XC700
Problem: Bei allen 24mm und 26mm Marzocchi Gabeln muss man das Tauchrohr mitsamt der Dichtung aus dem Standrohr ziehen, weil das Tauchrohr unten eine Kunststoffführung hat, die breiter ist als die Bohrung des Öl Simmerringes.
Lösung: Je nach Zustand geht das nur mit viel Kraft oder auch mal ganz leicht (verbrauchte Dichtung). Bei XCR und DH3 geht es ohne, da sind die Tauchrohre gleichmässig dick und werden unten im Standrohr verschraubt.
Für das Rausziehen lässt man zuerst Luft und Öl ab, sonst gibt es eine Riesensauerei. Dazu über das Ventil entlüften und den Aludeckel entfernen (–> Air Cap Puller).
Das Tauchrohr kann man am besten anfassen mit einer Gabelkrone. Schraubstock, Rohrzange und anderes Werkzeuge sind dafür nicht geeignet! Dann muss man das Standrohr nach unten befestigen, also z.B. einen Stab durch die Bohrungen schieben, draufstellen und dann oben ziehen. Die Öffnung vorher mit einem Tuch umwickeln, es wird Öl spritzen.
Eleganter und mit weniger Kraft geht es, wenn man sich entsprechende Vorrichtung baut. Ich habe an meiner Werkbank einfach einen 6mm Bolzen im Fuß der Werkbank, da hänge ich das Federbein in eines der Löcher ein. Eine alte Gabelkrone habe ich angeschraubt. Der Bolzen ist gerade so hoch, das ich jetzt oben auf der Werkbank z.B. mit einer Holzleiste unter die Gabelkrone hebeln kann und damit das Tauchrohr mit minimalem Kraftaufwand aus dem Standrohr ziehen kann. Plopp! 🙂
Pull the stanchion tube out of the slider tube
Affected Modells: XC500, XC600, XC700
Problem: With all 24mm and 26mm Marzocchi forks you have to pull the stanchion tube together with the seal out of the slider tube because the dip tube has a plastic guide at the bottom that is wider than the bore of the oil seal.
Solution: Depending on the condition, this can only be done with a lot of force or very easily (used seal). With XCR and DH3 it works without, because the immersion tubes are evenly thick and are screwed into the bottom tube.
To pull out, you first let off air and oil, otherwise you will get a huge mess. To do this, vent through the valve and remove the aluminum cover (–> Air Cap Puller).
The best way to handle the stanchion tubes is with an older fork crown. Vices, pipe wrenches and other tools are not suitable for this!
Then you have to fix the standpipe down, e.g. push a rod through the holes, put it on top and then pull it up. Wrap the opening beforehand with a cloth, it will splash oil.
It is more elegant and with less power if you build yourself a suitable support. I simply have a 6mm bolt in the base of my workbench, so I hang the fork leg in one of the holes. I screwed on an old fork crown. The bolt is just so high that I now on top of the workbench can put a wooden strip under the fork crown and thus pull the stanchion tube out of the slider tube with minimal effort. Plopp! 🙂
Alu Ventildeckel (17) ausbauen
Betroffene Modelle: All
Problem: Corrosion
Lösungen:
- Einfachster Fall: Kein Rost, Deckel lässt dich leicht rein und rausdrücken. Immer mit dem Air Cap Puller rausziehen, niemals Zange verwenden! Das Ding ist sonst sofort kaputt, es ist ja nur aus Aluminium!
- Allerschlimmsten Fall (fest, verrostet, Alu oxidiert) versuchst Du die Kappe nicht nach oben rauszuziehen sondern das Tauchrohr zu entfernen und dann den Deckel nach unten vorsichtig durchzudrücken. Der meiste Rost ist oben auf dem Rand und an der Oberkante des Alu Deckels!
Dazu ziehst Du zuerst das Tauchrohr aus dem Standrohr (z.B. mit montierter Gabelkrone). Evtl. sogar vorher über Kopf mit WD40 ein paar Tage einweichen. Dann nimmst Du eine möglichst große Inbus Nuss (13mm?) oder was ähnliches, was sich auf dem Aludeckel (4) und nicht auf dessen Schrader Ventil Gewinde abstützt und klopfst das mit entsprechender Knarrenkasten Verlängerung(en) vorsichtig nach unten durch.
Disasemble Aluminium Valve Air Cap (17)
Affected Models: All
Problem: Corrosion
Solutions:
Korrosion im Tauchrohr & Ventildeckel bearbeiten
Betroffene Modelle: All
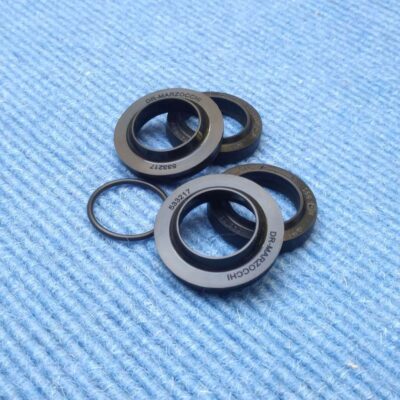
Problem: Durch Feuchtigkeit oben am Tauchrohr korrodiert das Stahlrohr und der Aluventildeckel. Dadurch sitzt u.U. der Ventildeckel fest (Lösen ist ein anderes Thema), der Deckel dichtet nicht mehr richtig etc. Dringt weiter Öl ein rosten der Sprengring 38 und der Seegerring 38H und müssen ggf. ersetzt werden.
Lösungen:
- Nach Demontage mit Messing Rundbürste den Rost im Standrohr sorgsam entfernen. KEINE Stahlrundbürste verwenden, die beschädigt das Rohr!
- Mit feinem Schleifvlies (ca. 1000) den Aludeckel von der Aluminiumkorrosion befreien.
- Lässt sich der Rost im Stanchion nicht sinnvoll entfernen Ersatz suchen.
- Deckel leicht ölig halten.
Handle corrosion on stanchions and valve air caps
…
XC500 : Screw off grub screw part no. 314
Affected Models : XC500
Problem : This grub screw has been clued during montage by Marzocchi and can’t be screwed off with the 2mm allen hex key. If you try to unscrew it, you will probably kill the allen key in the grub screw! You need to screw off this one if you want to dissassemble the assembly part. no. 301 (damoing adjustment).
Solution : Make it hot using a hot air blower.
- take the sticker away
- take the grub screw carefully out. If the screw resists against screwing out, make it hotter.
As the XC500 is not painted but has an eloxal finish there is problem with heat.
XC500 : Madenschraube () ausdrehen
Betroffene Modelle: XC500
Problem: Ohne Lösen der Madenschraube kann die Dämpfereinheit nicht ohne Beschädigungen ausgebaut werden! Madenschraube ist fest, weil sie mit Gewindekleber eingeschraubt wurde (das ist Marzocchi Standard); hohes Risiko den Sechskant der Madenschraube rund zu drehen.
Lösungen:
- Warm machen ohne offene Flamme.
1. Lösen der Schraube mit Schlagschrauber
- vernünftiges Bit verwenden, gerade ansetzen!
- Der Schlagschrauber schont das Bit und die Handgelenke.
2. Lösen der Schraube mit Festo Akkuschrauber mit hohem Drehmoment
XC400 and older : Unscrew the upper tube fitting
Affected Models : <= XC400, … all fork before the XC500 with a top screw
Problem : Verschraubung fest, geklebt, Hakenschlüssel erforderlich, abrutschen, Befestigung …
Solutions :
- Heat
- Suitable Hakennasenschlüssel
Produkte
-
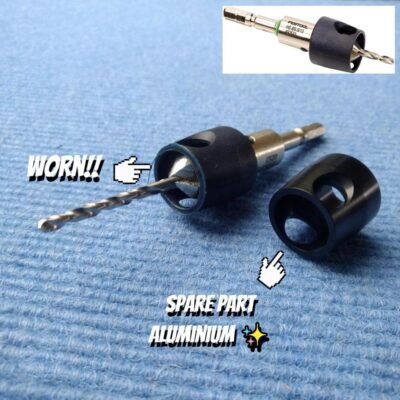 Replacement 'Depth Stop' Spare Part for Festool Drill Countersink for CentroTec use
Original price was: 59,00 €.24,99 €Current price is: 24,99 €. VAT included
Replacement 'Depth Stop' Spare Part for Festool Drill Countersink for CentroTec use
Original price was: 59,00 €.24,99 €Current price is: 24,99 €. VAT included
-
 Marzocchi SHIVER SC Guard/Protector SET (2002-2005) MTB
Original price was: 95,99 €.68,00 €Current price is: 68,00 €. VAT included
Marzocchi SHIVER SC Guard/Protector SET (2002-2005) MTB
Original price was: 95,99 €.68,00 €Current price is: 68,00 €. VAT included
-
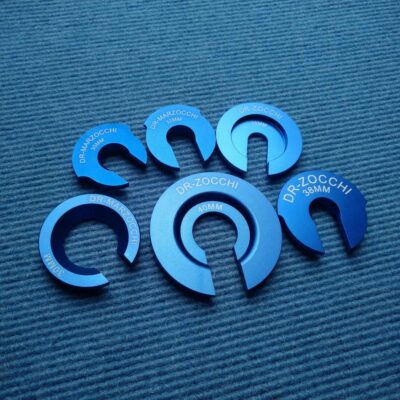 Dr-Zocchi Slider Protector SET for 30 / 32 / 35 / 38 / 40mm Forks (6 Tools!)
Original price was: 89,00 €.70,00 €Current price is: 70,00 €. VAT included
Dr-Zocchi Slider Protector SET for 30 / 32 / 35 / 38 / 40mm Forks (6 Tools!)
Original price was: 89,00 €.70,00 €Current price is: 70,00 €. VAT included
-
 Marzocchi SHIVER DC 35mm original Cartridge (used)
Original price was: 185,00 €.160,00 €Current price is: 160,00 €. VAT included
Marzocchi SHIVER DC 35mm original Cartridge (used)
Original price was: 185,00 €.160,00 €Current price is: 160,00 €. VAT included
-
 Marzocchi Original Dust/Oil Seal Insertion COMBI Tool for all ⌀32mm Bomber's R5125/C
Original price was: 99,00 €.79,00 €Current price is: 79,00 €. VAT included
Marzocchi Original Dust/Oil Seal Insertion COMBI Tool for all ⌀32mm Bomber's R5125/C
Original price was: 99,00 €.79,00 €Current price is: 79,00 €. VAT included